
QRD Technical Reference
A QRD diffuser comprises wells of different depths, causing a mixture of phase shifts that diffuse reflected sound. They are used to control reflections in the listening environment, particularly from rear walls and first-reflection points.


Information on QRD diffusers is piecemeal and scattered across many sites and forums on the Internet,
making it difficult for those who would like to know more about these devices.
This page provides both a stand-alone overview of QRDs and a technical reference for the QRDude calculator.
Much of the information presented here is an interpretation of the following book:
Acoustic Absorbers and Diffusers: Theory, Design and Application By Trevor Cox, Peter D'Antonio
Google books has a
link to the book.
Understanding the book is very much a work-in-progress, and such, the content of this page, and the capabilities
of the QRDude calculator, will change over time.
This page aims to make a contribution by:
- Bringing all the information together and explaining the principles in layman's terms, using plenty of drawings.
- Looking at advanced panel designs within the QRD framework
- Simplifying the maths by presenting the QRDude calculator which supports standard and advanced panels
- Presenting easy to understand strategies for using multiple panels
- Adding some construction tips
- Including a list of references
A quick word about diffusion patterns for single and multiple panels
When a QRD panel is used stand-alone, the phase shifts introduced by the wells
produce concentrations of energy in given directions.
The interraction of these produces a complex diffusion field that becomes increasingly difficult to model as the number of
wells is increased. The QRDude calculator shows a 'scattering' drawing to help visualise this, but doesn't compute the actual
angles.
Single panels are of use, but QRDs are meant to be used in arrays of multiple panels...
When multiple panels are used, constructive and destructive reinforcement
between the reflections from each panel produces lobes of concentrated energy at known angles.
These lobes take precedence over those generated by the individual panels,
and can be computed.
The QRD formula ensures that these lobes are of equal energy at multiples of the design frequency.
These special frequencies can be thought of as the "true diffusion" frequencies.
At other frequencies, the lobes will vary in intensity.
It is this 'equal energy' aspect that is the QRD's main claim to fame.
The QRDude calculator has a Lobes screen that allows these lobes to be modelled
for incoming signals at varying angles.
Standard panels
The magic of the QRD design is in the formula used to determine the depths of the wells, which are chosen using
Dr. Manfred Schroeder's formula, developed in the 1970's:
Depth = (well position)^2 mod N
... where N equals the number of wells, and is a prime number.
N is also referred to as the panel order
(Don't freak out just yet - there is a link to the QRDude calculator further down the page)
The squared portion of the equation determines the phase shift introduced by each of the wells
and the mod operator keeps the shift within the range from 0 to 360 degrees.
Raising a number to a power is known as a Quadratic operation.
Applying the modulus operator divides a number by the modulus and only keeps what's left over, known as the
Residue.
This explains why the design is called a
Quadratic Residue Diffuser, or QRD diffuser for short.
As an example, here are the depths for the popular N7 panel.
| Well position | Well position squared | Well position squared mod 7 |
| 0 | 0 | 0 |
| 1 | 1 | 1 |
| 2 | 4 | 4 |
| 3 | 9 | 2 |
| 4 | 16 | 2 |
| 5 | 25 | 4 |
| 6 | 36 | 1 |
Note: The wells count from 0 to 6, not 1 to 7

A graphical look at the mod operator
The following drawing illustrates how the mod operator keeps the phase shift from the wells within the range 0 to 360 degrees
(at the design frequency).
The well depths shown in green are for an N7 diffuser if it didn't have the mod operator.
The red numbers on the left are the actual depths (well position squared)
The boundaries that are multiples of one wavelengths are shown as dark horizontal lines.
The vertical arrows (blue), show the mod operator removing the multiples, producing the standard N7 pattern (grey)

Ok, that's enough maths for the time being - here are some easy principles....
- The design depth of the panel is half the wavelength of the design frequency
- The design depth is divided up into the same number of segments as there are wells.m When the zero-depth position is included, this gives N+1 possible depths
Standard panels can use depths 0 to N-1
Inverse panels can use depths 1 to N - Not all depths are used (because the squared part of the equation makes the distribution non-linear)
- As the number of wells increases, a higher proportion of the available depths are utilised (usually)
- A panel only needs to be as deep as it's deepest well. This is known as the build depth. (does not include thickness of backboard)
An example using three QRD panels, all having the same design frequency and design depth, but different build depths

Typical QRD panels
- The N7 panel has depths of 0 1 4 2 2 4 1 depth units
- The N11 panel has depths of 0 1 4 9 5 3 3 5 9 4 1 depth units
- The N13 panel has depths of 0 1 4 9 3 12 10 10 12 3 9 4 1 depth units
Note that the height of an individual depth unit is different for each of the panels
When it comes to building these panels, the unused sections at the bottom, shown in grey, can be left out...
- The build depth of the N7 panel only needs to be 4/7ths of the design depth
- The build depth of the N11 panel only needs to be 9/11ths of the design depth
- The build depth of the N13 panel only needs to be 12/13ths of the design depth
In terms of build depth, the N7 panel is the most economical of the standard panels, meaning it is the one you will most often find for sale.
Some advanced panels also have good build depth savings... (there is a table in the QRDude user guide)
Just for a bit 'O fun, here are the first few standard panels showing how the profiles and build depths change.
Drawn to scale with half-width end wells (discussed in the QRDude user guide).
Notice that the build depth for the N7 is much less than that of the N5 or N11

Advanced panels
The formula can be modified by adding a constant before applying the mod operator...
Depth = ((well position)^2
+ V
) mod N
... where V is a whole number
This is equivalent to moving the well bottoms down the number of depth units specified by the constant V.
When this process causes a well to reach the full design depth, the mod operator forces it to revert to a zero-depth well.
The relationship between adjacent wells changes, meaning a new panel is born.
More significantly, the build depth is often changed.
Some configurations lead to panels that are more economical in terms of depth than the standard panel
, allowing for a shallower panel or a lower design frequency
As an example, here is the saving achievable for an N13 panel...

Standard N13 panel vs N13+4 advanced panel
It was the desire to investigate this phenomenon that lead to the development of the QRDude calculator - see the user guide for much more information on this topic.
Well width vs Fin width
I was asked recently about this. The difference is shown in red with the next drawing.

Build depth vs Physical depth
When building panels, you normally have a backboard that both supports the panel,
and acts as the floor plate for the deepst well. The overall physical depth of the panel will be the stated build depth
plus the thickness of the backboard
This becomes clearer if the panel is drawn so that the thickness of the floor plates and backboard can be seen.
The following drawing shows three different ways to build an N13+4 advanced panel.

If a ply over styrofoam core method of construction is used, the height of the cores depends on the backboard option used. This can also be seen in the above drawing. For the third option, the core heights equal the block heights as listed by QRDude. For the first two options, the core heights equal the listed block heights minus the floor plate thickness. These adjustments need to be done manually.
Huygens principle of diffusion
How phase shift can "steer" a wavefront
This principle works by treating points on the surface that is reflecting the wave, as new transmitters.
A series of concentric circles can be drawn around each point, where each circle represents the peak of the wave.
Where a delay in reflection takes place, because the signal has to travel down a well and back up, the circle is drawn smaller
Because the panel operates using phase shifts, rather than resonances, the panel can be shallower than half the wavelength of the design frequency.
In the next drawing, the inner circles show the position of the crests at a time when signal from the first well has travelled one wavelength away from the point.
The outer circles show the situation one cycle later. This example is for an incoming signal at the design frequency of the panel
Note that for illustrative purposes, the panel is drawn to a larger scale than the circles
Since the panel used in this example has 7 potential depth levels, (not all used), each successive level adds a delay of 1/7th of a wavelength at the design frequency.
With this in mind, it is convenient to draw the inner circle of the first well with a radius of 70pixels
The second well introduces a delay of 1/7th of a cycle, so it's inner circle is drawn with a radius of 60pixels.
The third well introduces a delay of 4/7ths of a cycle, so it's inner circle is drawn with a radius of 30pixels, and so on...
The resultant wavefront shows how a wave approaching the panel from head-on will be reflected. The arrows show the new directions.
As the frequency of the signal changes, the relative phase shifts between the wells also change, meaning that the diffusion directions change.

Well width
The width of the wells determines the High Frequency (HF) cutoff frequency,
where the width represents one half-wavelength
This is only for the incoming signal straight-on. For other angles of incidence, the HF cutoff is decreased,
falling to zero for a signal striking from side-on.
Reduction in HF cutoff frequency due to signal angle
The following drawing has three pictures, each of a signal striking one well of a QRD diffuser, with
the dotted lines indicating the direction of the incoming signal.
In the first picture, the signal is straight-on to the panel. The other two picures show the signal at an angle
The blue bar at the top of each picture represents the width occupied by half a wavelength of the incoming signal
For a QRD panel to operate correctly, the half-wavelength of the signal travelling in the well must not be smaller than
the well width. (first picture)
When the angle of incidence is not zero, the "apparent wavelength", or more correctly, the "horizontal component", of
of the signal decreases in size. At the original HF cutoff frequency, this component of the signal is now
less than the width of the well. (second picture)
Since this violates the rule, the wavelength of the incoming wave must be increased,
in other words, the HF cutoff frequency must be decreased. (third picture)
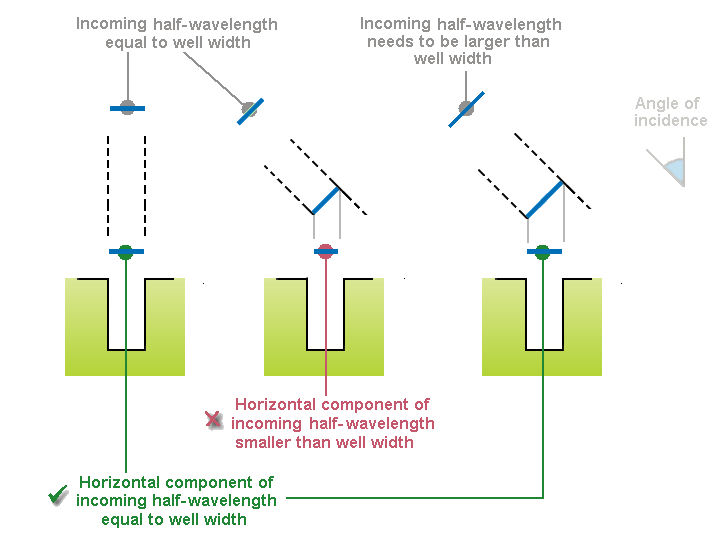
The amount of adjustment depends on the angle of incidence. When the angle reaches +/-90 degrees,
the HF cutoff falls to zero, meaning no diffusion.
The actual equation is:
New HF cutoff fequency of panel = Original HF cutoff * sin ( abs ( 90 - angle of incidence ) )
Period width
Period width is the width occupied by the wells plus the same number of fins. It doesn't include any framing or the
additional end fin needed with a stand-alone panel.
The period width has to at least equal the wavelength of the lowest frequency diffused
, ie the period width needs to be at least double the design depth.
If this is not the case, (ie wells too narrow), the lowest diffusion frequency will be higher than the design frequency
For most panels, QRDude sets the well width to meet this requirement.
Minimum width and Viscous limit
If the well width is too small the signal is degraded by viscous losses.
It was originally thought that these losses were due to friction between the moving air and the narrow walls.
Since then, it has been found that the main cause of absorption losses is due to resonant behaviour.
Energy is transfered from in-resonance wells to adjacent not-in-resonance wells. In addition, quarter-wave
resonance causes absorbtion in narrow wells.
(source: Cox and Antonio )
Experimental builds have shown that wells can be made as narrow as 25mm (1 inch) for well depths up to 400mm (16 inches).
(source: AES article)
For panels deeper than 400mm, the minimum well width should be equal to the build depth divided by 16.
The QRDude calculator uses this 2-step rule to find the viscous limit.
Maximum width
The wells should be narrow in relation to their depth.
The original Schroeder recommendation was: Maximum well width = design wavelength times 0.137
Geoffrey Martin's thesis, "A hybrid model for simulating diffused first reflections in
two-dimensional acoustic environments", repeats the Schroeder figure, and further suggests that this could be
lifted to design wavelength times 0.5
Whilst this would make the wells as wide as the design depth, which is obviously too wide, it does show that wells can be
wider than the minimum one inch limit.
Some early calculators used a fixed ratio of design wavelength times 0.25
The QRDude calculator does not currently impose a maximum well width.
Practical widths
Lower-order panels generally have their well widths defined by the period width requirement.
As the panel order (number of wells) increases, the wells can become narrower, giving improved bandwidth,
until the viscous limit is reached.
It's interesting to note that until the viscous limit is reached, panel size remains much the same for the different orders.
In practice, well widths are usually tweaked up or down slightly to give a standard panel width,
for physical compatibility with other acoustic products.
An example of this tweaking would be fitting an N13 panel into a one foot wide panel, meaning that the well widths
would be a bit under the one inch limit. The potential excessive viscous losses could be mitigated by ensuring
that the panel is not too deep. One supplier that uses this arrangement limits their panel depth to three inches.
Plate frequency
The wells in any QRD panel have depths that are multiples of half the design wavelength divided by N (the number of wells).
If the panel is asked to deal with a frequency that is the design frequency times N, something
interesting happens. This signal will have a wavelength that is 1/N of the design wavelength.
For all wells, the signal will be shifted by an exact multiple of it's wavelength. In other words, they are all
in phase, so no diffusion occurs. The panel is acting as a flat plate and just reflecting the signal.
This represents a hard upper limit to the panel. For a typical N7 panel with a design frequency of 500hz,
the plate frequency will be 3500hz.
You can stop this from being a problem by moving to higher order panels, or by increasing the design frequency
Low frequency cutoff
Below the design frequency, diffusion no longer occurs,
but it is generally accepted that scattering is available
down to one octave below the diffusion limit.
For diffusion to occur, the wavelength of the lowest frequency diffused must be no larger than the
period width of the panel.
If this rule is not met, then the lowest frequency diffused is the frequency that does fit into the period width.
This frequency is referred to as f_period, and the new scattering limit
becomes one octave below this.
Usable range
The usable range for the panel runs from the start of the scattering range, up through the diffusion range,
ending at the HF cutoff frequency.
The QRDude Usable ranges explorer is accessible from the 'explore' link located
at the right of the frequency ranges field on the main screen. Use it to visualise the ranges, and to see how the HF cutoff
frequency changes with the angle of incidence of the incoming signal.

Minimum seating distance
For the interferrence patterns to fully develop into a diffuse field, it is recommended that the minimum seating distance be three times the longest wavelength diffused.
This is based on the Cox and D'Antonio book (section 2.2.1). Google books has a display of the relevant section
For stand-alone panels, the distance is based on the lowest diffusion frequency rather than the start
of the usable range
For multiple panels, the lobes screen displays a revised seating distance that a based on the frequency
at which the lobes start, provided this is within the usable range of the underlying panels.
This takes into account the situation of lobes that are energised via the scattering range of the underlying panels,
as well as the effect of signal angle changing the lobe starting frequencies.
Number of wells
As the number of wells is increased, the effectiveness of the diffusion increases

Changes with more wells - from soundex.ru
Multiple panels and Barker Codes
Multiple panels are required for the QRD to achieve equal energy lobes (four or more panels are recommended), however as the number of panels is increased, reinforcement leads to narrower and stronger lobes.

Diffusion lobes for groups of standard N7 diffusers at the HF cutoff frequency for 1, 6 and 50 periods respectively
Values for number of panels taken from Naziema Joeman thesis
This topic is covered in the chapter entitled The curse of periodicity in the book : Acoustic absorbers and diffusers: theory, design, and application By Trevor J. Cox, Peter D'Antonio, considered to be the bible when it comes to QRD diffusers. They advise that the excessive lobing can be offset by modulating the sequence via the introduction a second style of panel, positioned as per the Barker code.

Barker codes - based on info from Wikipedia
Where there is a +1 in the sequence, use your standard panel. Where there is a -1 in the sequence, use an inverse panel

All known Barker sequences that produce correct lobe cancellations
The next picture shows the lobing response from a group of like panels (light trace) versus that from a group that is modulated with inverse panels

Changes with modulation
There are several possibilities for the modulating panel to be used:
- An inverse panel is one that inverts the well depths. For example, with an N=7 panel, 0 becomes 7, 1 becomes 6 etc. etc. This is the best solution, and is the one you would use if you were custom treating a large space, such as an auditorium or church. A standard inverse panel takes up the full design depth, and so will be deeper than the normal panel, although advanced panels can overcome this limitation.
- Use a panel based on a different prime number. The panel depth most likely will be different
- Use a panel based on a different prime number and design frequency. The panel depths may be able to be matched
- Rotate a standard panel by 180 degrees. This is the simplest solution, although the change in diffusion angles is small compared to that obtained with the other approaches. The panel is equivalent to a standard panel that has been left-shifted one well
-
If your panel is square, rotate it sideways by 90 degrees, so the fins are horizontal instead of vertical.
This is the most common solution. You can also do this with a pair of half-width panels.
For the rotated panel, the amount of delay depends on the angle of the signal striking the panel. When the signal is approaching across the fins, or from head-on, the panel will diffuse as expected. When the signal approaches parallel to the fins, the diffuser acts more like a normal wall.
For this reason, rotated panels are of more use on end walls, than they are at the first reflection points on side walls or roofs.
It seems that actually modulating periodic arrays is more important than which particular style you use for the second panel.
Creating a Proper Inverse Panel
An inverse panel is basically the back of a full-depth normal panel. To flip a normal panel in reality, it would need to have been
built to the full design depth, have no backboard, and have infinitely thin well bottoms.
The following drawings show the sequence of steps to derive an inverse panel, using an N7 panel as the example.
Step one: Standard panel. The original "free-ride" depth is shown in grey
Step two: Flip the panel over. The "free-ride" area must be included,
so it is now shown in green
Step three: Replace the solid area with air, and the empty bit with the new panel
(shown in brown).

This might be made clearer by comparing the phase shifts for normal and inverse panels...

Here is an example of using an inverse panel in a Barker sequence...

Barker sequence of three N13 panels and one I13 panel
You can even do this with 2D QRD panels (fins not shown)...

2D panels modulated - six centred N5 2D QRD panels and three inverses
With the abundant diffusion from 2D panels, it is not likely that you would see this arrangement. A more likely situation is shown in the next image, which uses all one type of diffuser, built assymmetrically, and rotated where the alternate panel is required (fins not shown).

2D panels modulated - nine assymetrical N5 2D QRD panels with three rotated
One of the major manufacturers simplifies this even further, advising that random orientation be used with their 2D diffuser
Arrays of 2D panels look great arranged with ordered rotations rather than just random arrangements. Here are
a couple of schemes used by Wes Lachot Designs using depth-optimised
inverse N7's.
Check out their site for some impressive photos! The yellow dots and black frames have been added to show the location
of the zero-depth wells, highlighting the balance between periodicity and variety.

Sample 2D arrangements - 12 panels each
Opinion only: For 1D QRD installations where the number of repeats is small, say four or less, the intensity of the lobes is small enough to get away with not using modulation. If you go this way, the following process will help...
When planning your installation, divide your available width by 25mm, or one inch. This will tell you the highest number of wells you can use. Divide this by four to find the number of wells per panel. Round this off to the first prime number that is smaller than your result to find the panel order. If this turns out to be less than seven, you need to use less than four panels.
Diffusion lobes
Diffusion lobes are created when a number of repeats of a periodic surface are placed together in a sequence.
For multiple QRD panels, the number and angle of the diffusion lobes varies with the panel order and panel width,
and the frequency and angle of incidence of the incoming wave.
For a signal straight-on, there are usually three lobes at the design frequency, and at the HF cutoff frequency
there are often the same number of lobes as there are wells.
As the angle of incidence is increased, starting frequencies for each of the lobes decreases slightly for lobes on
the same side of the diffuser as the incoming signal. Lobes on the other side shift to a higher starting frequency
by a larger amount. The angle of the lobes also changes, as does their relative angular spacing.
In addition, the apparent wavelength of the signal changes as far as the wells are concerned,
leading to a lowering of the HF cutoff frequency. When the angle of incidence reaches +/-90 degrees,
the HF cutoff falls to zero, meaning no diffusion.
Here's a concept drawing of some N7 lobes, which was was done to help visualise how the V3:00 of QRDude
would display it's new lobes screen

See the Lobes for multiple 1D panels page for full coverage of this complex topic.
Fins
The fins are the walls between the wells, and run the full depth of the diffuser.
Some cheap foam panels have the fins missing, but this lessens the effectiveness - leave them in.
They need to be as thin as possible, whilst still being rigid. Apparently some early models used aluminium
but then switched to wood, possibly due to ringing and cost.
Normal timber, MDF or plywood all work well. Maybe even laminex would be a good choice.
Fin width can be adjusted to give a panel of a particular overall size, however it should
always be small in relation to the well width
Q: How many fins?
A: It depends on the usage. Here are some examples showing the difference between period width and panel width
for different situations.
When a panel is used in a sequence of panels, the right-hand fin for the last well is formed by the left-hand fin of the
next panel. In this case, the number of fins per panel equals the number of wells,
and the panel width exactly equals the period width.
For a stand-alone panel, or for the last panel in a sequence, the missing fin has to be added.

An exception is a stand-alone panel which is built with half-width end wells. No additional fin is required, and the panel width is the same as the period width

A small panel that is to be used as a well insert needs no end fins because these are provided by the walls of the surrounding well. See the "Fractal it" section further down this page for more on inserts.

Just as you had to manually add the thickness of the backboard to the build depth to get the overall physical depth, you will need to add the thickness of any end fin to the period width to get the overall physical width of the panel
How bad is it really to leave out the fins?
Below is the drawing shown earlier, demonstrating the huygens diffusion from a panel with fins.
Underneath that is one without fins.
You can see that the location of the re-radiating centres for the wells have shifted,
plus the amount of phase shift introduced has changed. The arrows show there are different diffusion angles, and with
some of the arrows roughly parallel, the intensity of the lobes has changed.
The mathethematical balance that supports even energy lobes with multiple panels is gone.
This is still a diffuser, producing shifts in both space and time, but it is no longer a QRD diffuser.
Huygens diffusion from a QRD panel with fins

Huygens diffusion from a panel without fins
Opinion only: The loss of support for even energy lobes is irrelevent for stand-alone panels. Some suppliers sell high-order panels without fins, and these are probably OK, provided they're used stand-alone.
Construction
The panel should be made of non-porus material, with all seams properly sealed, and with no cloth over the openings. This will minimise absorption losses.
To minimise weight, the bottom of the wells can be made using plates rather than a solid block that goes all
the way to the backboard.
Decware make a dual N13 kit that uses the neat trick of placing small blocks between the plates and backboard,
thus setting the correct height and keeping the plates square.
If you are using particularly narrow fins, you could minimise resonance problems by filling the voids with expanding foam.

Hollow construction
User "Moggie" at AVSForum built a whole heap of diffusors using this method. He found that expanding foam distorted the fins as it cured, so switched to rigid foam for the rest of the panels. Perhaps blocks to hold the fins during curing would overcome the problem. Check out the QRD part of the saga on page12 of his Home Theater build thread. Each step of the build has plenty of photos showing how it is done. Nice work!
Since a large part of the cost is in the fins, some savings can be had by only making them as deep as needed for each well.
Minimal backboard too...
Use some glue-saturated cloth to strengthen the back of the seams.

Short fin N13
Another method is to use solid foam blocks to fill the well bottoms and face with thin timber.
Xenon's QRD page has
plenty of photos of this style of build.
Here's a teaser shot of his magnificent N23 array...

Xenon's 4 * N23 array
Fold it
There really are some clever people out there. There was a mob called Soundscapes who sold a folded N=7 design to make it even thinner. Lighter too..

Folded N=7 QRD diffuser
Sadly, Soundscapes is no more, but the guy behind it, Toine Dingemans, publishes some designs on his new wesite. There are 4 different designs, covering different bandwidths and you can find them here
Toine also offers some evalution of QRD's, which you can find here
He makes some interesting claims about periodicity and efficiency that I would like to follow up when I have the time.
Fractal it
The people at RPG systems are the foremost authority on producing these diffusers in a range of styles
Their flagship product is the Diffractal DFR-72,
a 9 inch deep N7 diffusor which has a smaller diffuser inserted into the base of each of the wells.
Since the extra wells are much narrower, the HF cutoff is lifted to the top of the audible range.
The dimensions are the same as for their QRD-734 diffusor.
By mounting an array of seven diffractal diffusers in a staggered N7 pattern, quite low frequency diffusion can be achieved.
They refer to this as a DFR-73
They can even do custom installations with glass fins for those with super deep pockets.
Soundscapes offers a similar design, presumably under licence.

DFR-72 Diffractal diffuser from RPG
In cross-section....

Diffractal diffuser
Opinion only: Since the well inserts are at different relative heights, their diffusion patterns shouldn't reinforce to produce the exaggerated lobing that a group of standard panels give. If this is so, no Barker-style modulation of the inserts is needed, and they can all be the same.
The soundscapes site had a whole series of photos detailing a studio fitout with diy QRDs

These are made from MDF and would weigh a ton. They're roof mounted using steel pipe - see the whole series of pictures to get an idea of how much work went into this build
Two-dimensional panels
The panels discussed so far are referred to as 1D QRD's because the pattern runs in one direction across the panel
It is also possible to design 2D QRD's where the pattern runs across both the width and breadth of the panel.
They use the relationship:
Depth = (X^2 + Y^2 ) mod N
... where N equals the number of wells, with X and Y being the row and column position of the well.

An N7 2D QRD diffuser (based on the inverse maths)
Lower-order 2D panels require fins, as shown in the above picture. As the order is increased, the complexity of the reflected signal allows the fins to be omitted. Whilst the exact mathematical purity of the device is lost, the scattering is still effecive.

A finless N23 2D QRD diffuser. Side and front-shifted to centre the pattern
Depth-optimised inverse panels
Standard inverse panels all have one well that is the full design depth, producing a phase shift of 360 degrees.
When the panel is used to modulate a sequence of normal panels in a Barker-style" sequence, this well balances the shift
from the zero-deth well of the normal (non-inverse) panel.
An inverse panel is a QRD panel in its own right, and can be used as a stand-alone panel, or in a non-modulated sequence
if so desired. Under these circumstances, the full depth well can be replaced by a zero-depth well.
(trading 360 degrees of shift for zero degrees of shift)
Advantages
- The entire bottom layer can be dispensed wth, giving a shallower build, or a lower design frequency.
- Higher order 2D inverse panels are often built without fins - the lone zero-depth well ensures that the panel is mounted at the correct depth.
- The build depth of the normal and optimised inverse 2D panels is the same, meaning the choice can be made on aesthetics alone
Modulation is common for 1D panels, but virtually never used for 2D panels, so the method is more applicable to 2D panels. Here is a comparison of the style of inverse 2D panels available.

Inverse N7 2D panels compared
- The centre panel is the mathematically correct panel. This is what would be required to use Barker-style modulation with normal panels (seldom used, if ever).
- The panel on the right is a finless inverse, which, whilst not a correct QRD panel, produces good diffusion if the order is large enough (say N13 or higher).
- The panel on the left is the depth-optimised inverse. This is the style of panel available from commercial suppliers. The QRDude calculator supports all three styles
The FRG omniffusor from RPG, uses the depth-optimisation method.

FRG Omniffusor. When using multiple panels, the advice is to use a random orientation
RPG make a nice wooden version - see a small review of it
The modified onmiffusor from the same company adds an extra row and column to centre the pattern. Such a panel is no longer prime, and cannot be modulated, but certainly looks fine - a case of aesthetics vs performance. Given that RPG are the world's leading designers of QRD's, you would have to say that this is all OK...

RPG modified Omniffusor
Buy it
Building QRD diffusers can be a massive amount of work. If you are not that into DIY, and have the funds, purchasing these products is the way to go. The following companies have made a great contribution to the understanding of QRD diffusers.
- RPG has been generous in publishing much of their research material. For us Aussies, their distributor is Acoustic Panels
- Both GIK Acoustics and RealTraps have representatives who donate much of their time to helping out on various discussion forums
- The Decware N13 kit is an affordable way into the field if a 3 inch deep diffuser meets your needs
Commercial use
If you are intending to use the resources presented here to produce diffusers for sale, note that some of the features detailed are patented by RPG, (Examples would be the half-width end wells, and of course, the Diffractal®). It would be good insurance to contact them via the above link to check on their licensing requirements. There's no point in giving the lawyers a free lunch!
The QRDude calculator
This free software can be used to design standard and inverse 1D and 2D QRD panels, plus the advanced 1D panels.

QRDude screenshot (metric units also supported)
See the QRDude page to download the calculator and to see the full feature list and user guide.
For an example of QRDude use in optimising your room, see Chapter 8 of Vincent Verdult's new book,
"Optimal Audio and Video Reproduction at Home: Improving the Listening and Viewing Experience"
References
Acoustic Absorbers and Diffusers: Theory, Design and Application By Trevor Cox, Peter D'Antonio (Google books partial display)
The bible when it comes to QRD panels
Acoustic diffusers: The good, The bad and the ugly by TJ Cox, Salford University
An overview of diffusers, with some guidelines for designing and implementing QRDs
Engineering Art: the science of concert hall acoustics by Cox and Antonio
Overviews on huygens and mandlebrot, plus the drawing of how modulation can decrease lobing.
Musonics internal briefing paper on RPGs and QRDs
Covers fin widths and comparisons between QRDs and PRDs
Master Handbook of Acoustics By F. Alton Everest, Ken C Pohlmann (Google books partial display)
Note indicating importance of well dividers
Diffuser performance analysis by measured-based modelling.
2005 Thesis by Naziema Joeman, showing how number of diffraction lobes increases with frequency
Gearspace discussion on QRDs and bass panels
Long discussion during which this page and the QRDude calculator were developed
Gearspace discussion on building a QRD
Another long discussion during which QRDude continued to evolve and was used to help design Xenon's N23 QRD panels
Simple online Javascript QRD calculator
The simplest QRD calculator
mh-audio calculator (download)
Audio calculator for QRD panels and 2D PRD panels
Ethan Winer video on QRD diffusers
Video allowing you to hear how different types of diffusers change the sound in a room
Ethan Winer discusses QRD on musicplayer forum
Ethan from RealTraps and Bryan from GIK talk about QRD's vs Polys
Studiotips forum
Comprehensive acoustics forum
AES article on diffractal
Summary only - mentions practical limit of 1 inch width and 16 inches deep for wells
Video of N23 panel build
Narrated in Spanish, but subtitled
DIY Flutter echo panels
Several different QRD panels built by forum contributors
Build of diffuser using full blocks
Small QRD panels made with solid blocks for well bottoms
Interview with Schoeder
Nothing to do with QRD's, but gives an insight into the life of their inventor
Trevor Cox's homepage
Trevor is a Professor of Acoustic Engineering at Salford University, UK, and is the co-author of the book listed at the start of these references.
Additional QRDude pages: