
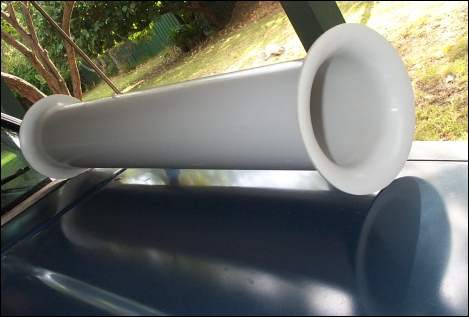
Heat moulded port flares
PVC pipe can be heated with a hot air gun and pushed onto a mould to produce a port flare
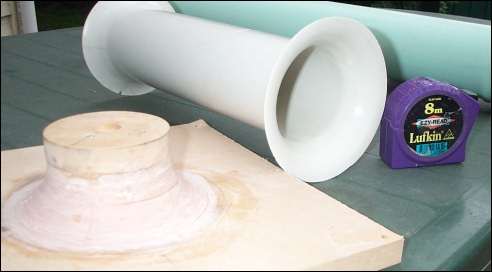
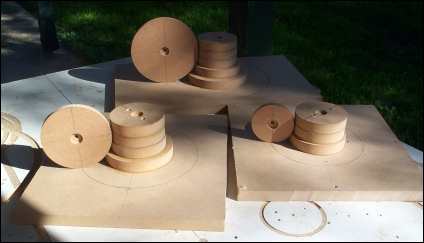
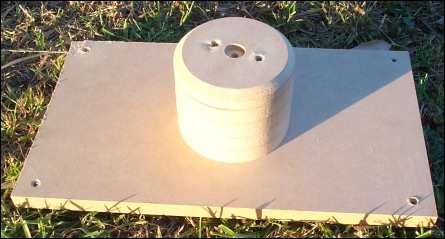
Making the moulds
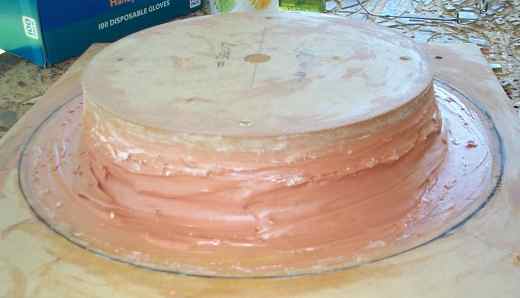
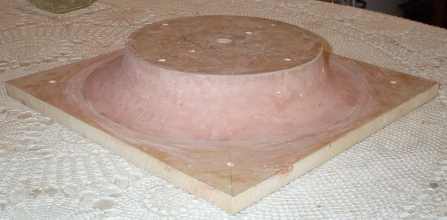
To make the mould, stack MDF disks of decreasing size and then cover with automotive body filler.
From thinner material, cut a disk of the desired flare radius to use as a scraper.
Draw a stop line on the baseboard where you want the port to stretch to.
Ten things you will need ...
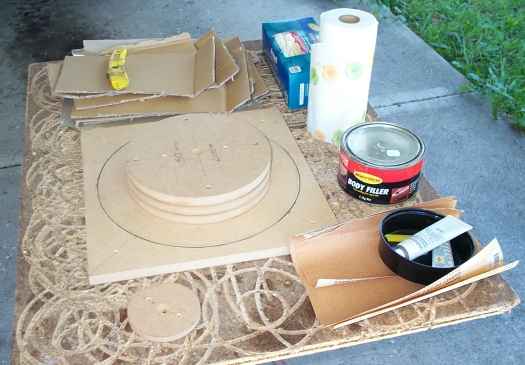
- MDF baseboard with rings
- Circular scraper
- Tin of Bondo
- Mixing sticks
- Latex gloves
- Cardboard squares for mixing
- Paper towel
- Sandpaper
- Brush
- Flat chisel
Whilst it is possible to use slightly larger MDF disks as you get closer to the baseboard, the savings in Bondo are minimal. It's easier to just make them all the same size.


Important Notice
Some PVC pipe is not suitable for the heat moulding method. In Australia, the local manufacturer of pipe some time ago changed from solid PVC to tripple-layer foam cored PVC. This was OK until the most recent change. The new pipe has a green core, possibly indicating some recycled content. The softening temperature of this pipe seems to be higher, meaning most ports end up with a bulge as well as a flare. Check your local conditions.
Heat moulding Tips
- Adding an extra disk on the top which is the same size as the last one makes it easier to keep the pipe upright. Routing a small rollover around the top edge of this disk will allow slightly out-of-round to be moulded without an unsightly ridge appearing in your flare.
- Heat the end of the pipe and place it over the mould. Continue heating with the pipe in place. This will help to stop the pipe from kinking.
- Occasionally take the pipe off the mould and apply heat to the inside of the pipe. Heating the mould as well reduces splitting.
- Keep the pipe upright as you work. Reheating later to "square up" increases the risk of kinking. Setting up a temporary jig is well worth the effort.
- Buy your pipe before making your mould and jig to avoid a bad fit due to production tolerances, and changes in manufacturer
- For a 25mm flare, you will lose about 20mm in length - 15mm due to the changed geometry and about 5mm due to distortion of the PVC depending on the wall thickness. A 40mm flare will cost 30mm in length and a 50mm flare will cost 38mm in length Measure a practice piece before and after flaring. You need to know this if you are flaring both ends.
- I've saved the best tip till last. Less heat more pressure.
Thanks to Paul Spencer on the diyAudio forum, who pointed me to Dan Cramer's project where a pair of 100mm ports are flared using this method
When making a one-piece port, you usually make the inside flare a little smaller
so you can install it after the box is finished.
If the inside is not flanged, you can just stop a bit early in the stretching process.
If you are going to flange, you'll need a second, smaller mould
so that the flare finishes at 90 degrees to the pipe. A 20mm inside flare will give you
a 5mm wide surface to glue the port into place.
The smaller inside flare will "chuff" a bit earlier than the outside flare. Because it only "chuffs" on the intake cycle, the inrush of air into the box can mask this. Some tests I did recently found that for normal ports, the inside flare can be about 5mm smaller in flare radius
Sizes achieved so far...
See the list of pipe sizes for exact internal diameter and PVC thickness|
Nominal diameter (mm) |
Flare radius (mm) |
Notes |
| 90 | 20 | No problems |
| 25 | Care needed to avoid bulges and splitting | |
| 100 | 20 | No problems |
| 25 | Prone to splitting - one good flare for every three tries | |
| 150 | 25 | No problems |
| 30 | No problem - could probably do 35mm | |
| 225 | 40 | No problem - tried 50mm but problems with splits and bulges |
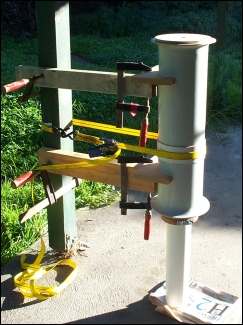
Staying square...
A temporary jig is used to hold the pipe upright whilst still allowing it to be turned and removed from the mould. The mould is secured to the table by screws, and a spirit level used get everything square.
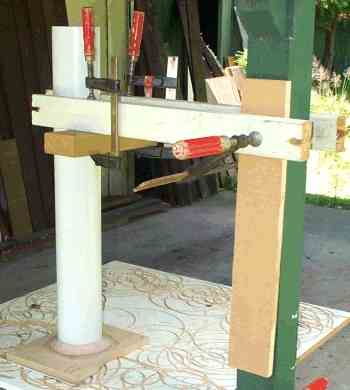
Marking the port length
This jig allows the port length to be marked squarely.
For short ports, this compensates for any slight angle problems with the first flare.
A marker pen is taped to the crosspiece, and the height set by measuring from the tabletop to the pen.
Rotating the port marks a circle that is parallel to the face of the port.
This method is most accurate for ports that aren't too long in relation to their diameter.
It is suitable for trimming single flared ends, or for cutting to length in preparation for flaring the second end

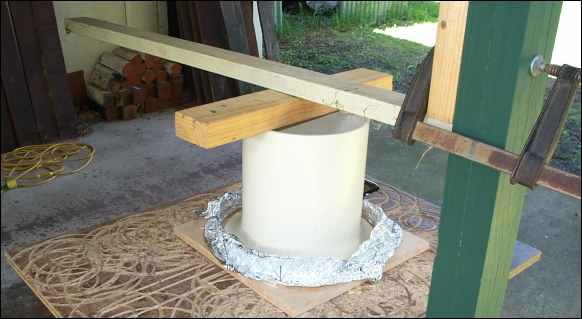
When flaring large diameter pipe...
Heating PVC pipe and pushing over a mold involves stretching the pipe. Naturally, the pipe wants to spring back to it's previous position. As you move to larger diameter pipes, the force involved eventually becomes too great to overcome with body weight alone.
Using a lever turns you into superman and allows you to hold the flare down whilst using a level to check that you are still 90 degrees to the table. When doing the second flare for a one-piece port, the cross peice makes it possible to use a tape measure to check your overall length as you go.
With a large port, getting the entire end hot enough to flare can be a problem. By the time you heat one side, the other side has cooled, particularly if there's any wind about. The trick here is to add a foil shield. This has the added advantage of funelling the air from your heat gun around the port, rather than most of it being wasted.
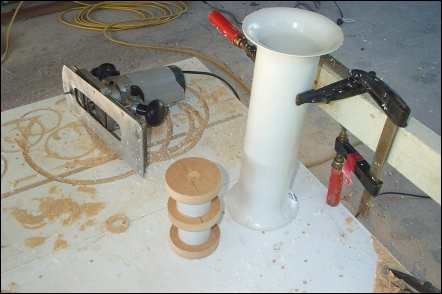
Centering jig...
After the PVC is stretched over the mold to form the flare, the outside edge will be somewhat irregular. A router can be used to trim back to a good edge. When cutting the disks for the mold, an extra three were cut to make this plug assembly which, when slid into the port and clamped provides support and a pivot point for the circle cutter.
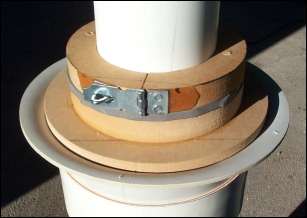
Since building this jig, some out of round pipe
came my way. This improved jig was required.
Tapered top and bottom plates keep the jig centred in the port so the router and circle
jig can cut a perfect circle around the outside of the flare.
The sliding bottom plate is held firm with a locking ring.

Locking ring clamp detail
In use
If the flare doesn't sit flat...

When you come to mount your port, you may find that, despite using a jig, the flange is not exactly sitting flat.
Use the heat gun to apply a small amount of heat to the section that is sitting up, then use a
flat piece of board to hold it down until it cools.
If you go to the extra trouble of making a one-piece port, it looks fantastic, however a two-piece also has some advantages:
- You can install the port after the box has been built and finished
- It is easier to flange the inside end of the port
- The inside flare can be the same size as the outside flare
- If you get a split or a buckle when making the flare, you only waste one end rather than the whole port.
- A two-piece port will however need a PVC joiner
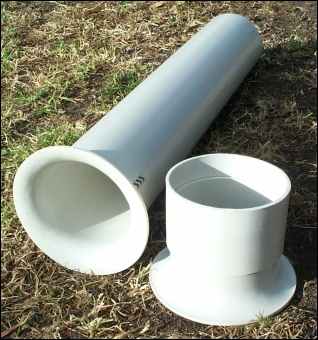
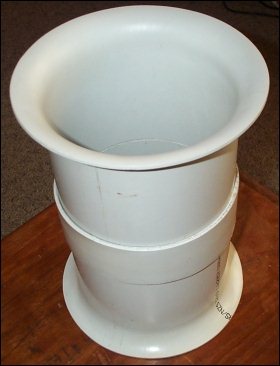
PVC Joiner
A simple mould made from MDF disks allows a heated piece of PVC pipe to be stretched to form a PVC joiner.
If you leave the PVC to cool on the mould, you will find it difficult to remove.
Taking it off hot means there will be some contraction as it cools.
To allow for this, make the mould diameter 2mm larger than the pipe you wish to join
To glue the pieces together you could use plumbers solvent glue, but it gives you zero working time and is intended for a tapered joint. It is better to use quick setting epoxy. Use masking tape on the inside surfaces to keep things clean.
| How do these 25mm DIY flared ports compare to commercial ports, which have a 30mm flare? | |
| Cheaper. Once you have the moulds, you can make as many as you want |
|
| Don't have to be imported | |
| Can be made one-piece | |
| Less mounting options | |
| Since the flare goes right to the edge of the port, there is no room for screws, so these ports have to be glued into place. They look best if they're rebated flush with the mounting surface | |
| Slightly lower usable velocity. According to Flare-it: | |
| For a 3 inch (75mm) port, reduce speed by 13% | |
| For a 4 inch (100mm) port, reduce speed by 11% | |
| The 6 inch diameter can be flared to 30mm, which excedes the performance of the PSP ports and equals that of the European Aeroports (if you can find 'em) | |
| The 10 inch diameter can be flared to 40mm. | |
Just for some fun, here's some info on the 10 inch ports
A pair of these are now being used in England for SPL competitions.
The owner used these ports to achieve 156.7dB, making him the current UK record holder in the Street B category
In addition to two sent to the UK, a pair has gone to the USA, one has gone to Canada, and two pairs locally to Australia
Here's a little background information on the rig he used to get the record
| Organisation | DB drag racing |
| Category | Street B ie. 2 12" subwoofers , 1 battery and two amplifiers |
| Battery | Cactus Sounds 9000 |
| Subwoofers | Digital Design 9512 , dual 1 ohm voice coils |
| Power cables | 10 runs of power and ground using 0 gauge cable |
| Amplifiers | Digital design Z1A's running at 0.5 ohm and at the time of testing they were pushing out 7000rms clean power. |
| Enclosure | 18mm thick plywood box with internal volume being 2.4ft^3. tuned to 72hertz, which is also the car's resonant frequency |
| Ports | Single 10 inch port with 40mm radius flares |