Speaker Building
Tips for building a speaker box with the following features:
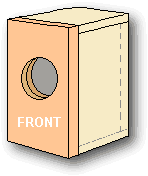
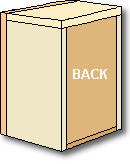
- A box that is square and true
- A minimum of visible seams
- Strong seams and shelf braced sides
- Port flares routed directly into front panel
- Front mounted, rebated driver
- Resonance damping materials in correct locations
- For a powered subwoofer, the amplifier is rebated with ventilation maintained
- No screws required
- Power LED rebated into front panel
Note: If you use Boxnotes to print your cutting list, all the panels will be the correct size for this walk-through
Arrangement of panels
This example sub box is built out of 18mm MDF, with a flared port of PVC pipe, and finished with either veneer
or rounded edges and three coats of polyurethane.
The front panel is double thickness, comprising an outer layer which has no visible seams and an
inner layer that is fully surrounded by the box
The top panel has a seam to the front, and the side panels have seams to the top and front.
The rear panel is fully surrounded by the box
The bottom panel is surrounded by the outer front and sides, but visible at the back
Tips for cutting rectangular panels
Check that your new sheet of MDF is square, and if so,
mark each corner.
This gives you a good corner and 2 good edges
to start with and you will be able to identify the good parts of the offcuts for later use.
Mark the other 2 edges 5mm oversize and cut with your power saw.
If you're not using a sawboard, make sure you
clamp your sheet when cutting to minimise kickback from your power saw
If an edge is not going to be visible ( butts up to another panel), it will need to be trimmed to the exact dimension.
This can be done with a router using a straight bit and a fence clamped as a guide. You will get a more accurate
dimension and a much straighter edge using this method
Note that photos used to illustrate the various steps have been taken from a variety of different projects
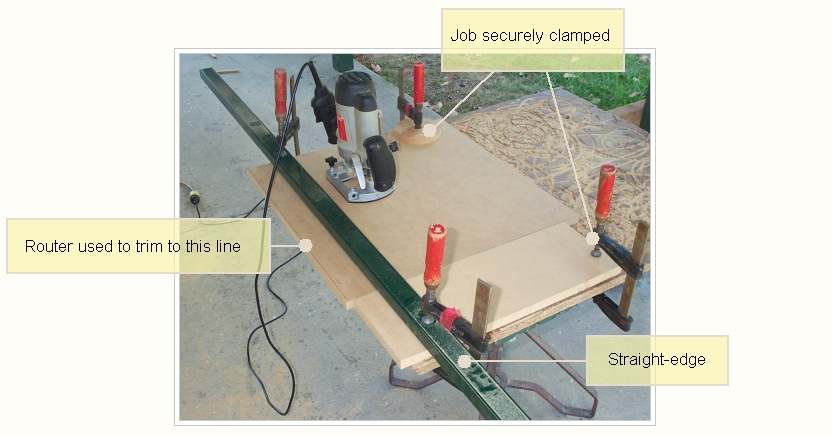
If the edge is to be visible, it can be "left hanging", and after gluing can be
cleaned up with the router using a flush trim bit.
This walk-through assumes the use of PVA glue, which takes 24 hours to reach full strength.
This generally means working alternate days.For example, Session 1 - cut route etc. and glue. Skip a day - drying not done till afternoon. The following day move on to next session
Some people prefer polyurethane glue (Aquadhere Durabond or Gorilla glue). This is gap-filling, but perhaps not as strong as PVA.
- Cut all pieces and router-trim good edges
- Route cutouts and rollovers on shelf brace
- Route slots for shelf brace in side, back, and front inner panels
- Route cutouts, bevels and rollovers on grille frame
- Glue front panel inner and outer together
- Optional amp support panel - make and glue to chamfered cutout in back panel.
Cutting the pieces
Cut the following panels:
Front inner panel and back panel - good corner top left - all edges exact
Two side panels- good corner top-front and leave back and bottom edges oversize
Top panel - good corner not required, (use offcut if possible) - front edge true,
sides and rear edge all oversize
Bottom panel - Good corner to front. Sides exact and rear edge oversize
Front outer panel - will be trimmed all round later so no need for a good
corner or edge at this stage. Cut 10mm oversize
Shelf brace - Cut to exact size
Grille - it's up to you, but 2mm smaller than the finished size of the box
leaves room for the grille cloth. Cut 10mm oversize
Amp support panel - Optional. Required if you want the plate amp to be rebated into the box.
Also cut some strips to be used for edge bracing. Make them the same width as the sheet is thick (square cross-section).
You will end up with 2 good faces and 2 ordinary faces - no need to trim with router as glue will fill the gaps.

The panels all cut. Red dots show good corners
Making the shelf brace
If you are using shelf bracing, cut out brace and route pattern through centre. Route rollovers on cutouts to improve airflow. If you leave the front edge until last, it will be easier to clamp this panel while you do all the fiddly stuff
The pattern to use for the shelf brace is up to you. I like to have a cross-strut as shown here. I make the width of the strut the same as the thickness plus a bit for the rollovers. The material around the perimeter I make 5mm wider to allow for what is rebated into the box itself. At the back of the bace, make some cutouts to clear the edge bracing for the back panel
The following photo shows how the shelf brace fits into the rebates cut into the walls. Also visible is the edge bracing. Note the pencil line drawn on the side walls indicating where the front inner panel comes to. This makes it easier to cut the edge bracing to the right length
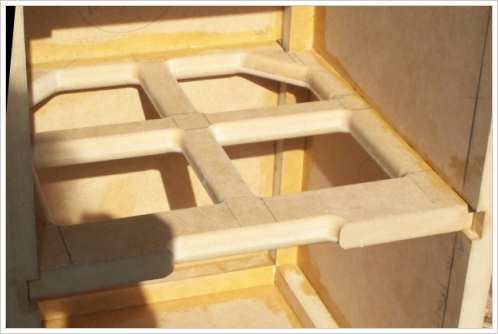
Routing the slots for the shelf brace
When marking up the position of the slot in the panels, measure down the same distance from the top of each panel
In the following drawing, the slot is shown in dark brown and the surrounding panels are shown in grey
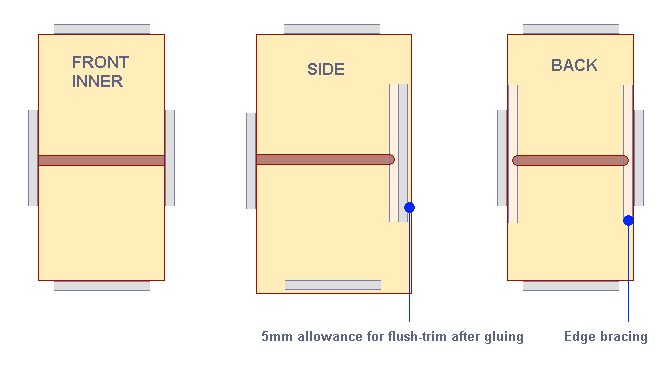
- Slot for the front inner panel goes right to the edge on both sides
- Slot for the side panels goes right to the front edge, but stops short of the back edge to allow for edge bracing, back panel and flush-trimming allowance. If you go right through, the slot will be visible from the back of your speaker.
- Slot for the back panels stops short of both edges to allow for edge bracing
Check the width and depth of the slot with an offcut. If you are using the cut list generated by boxnotes, the slots for the shelf brace need to be 5mm deep
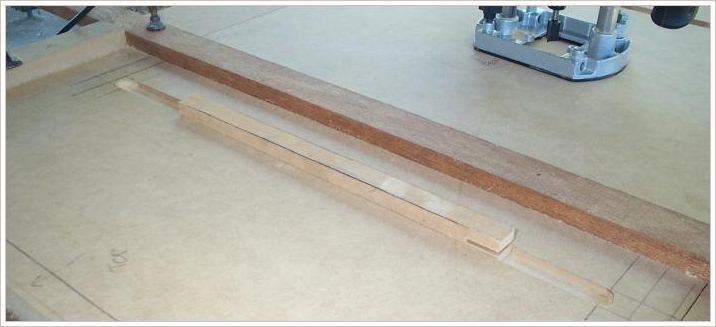
Making the grille frame
See the grille section on the construction tips page for some ideas on making and finishing your grille
Gluing the front panel
Glue front inner and front outer panels together, clamp well or park small car or large motorcycle on top
....just kidding, a stack of house bricks will do!
Use an offcut to check that the the outer front panel sits out by the wall thickness plus some flush-trimming allowance.
It's not important that it be dead square.
Optional Amp support panel for active sub
Plate amps are usually just mounted directly onto, or rebated into, the rear panel
If the box is ever laid on it's back, the amp controls will touch the floor, damaging the amp. This can be prevented by mounting the amp to a support panel inside the box...
Route cutout in rear panel and trim with a 45degree bit or rollover
bit to facilitate airflow across amplifier.
Glue and clamp extra panel to rear panel
Since the next session will not involve any cutting, overnight is sufficient curing time for this round of gluing
- Glue sides, top and bottom
- Paint the grille frame
Glue the sides
A ratchet tie-down strap works very well to hold everything together
Glue the sides to the top and bottom panels only. The front and back panels are not glued, and should
be protected with some sandwich plastic to stop glue getting onto them
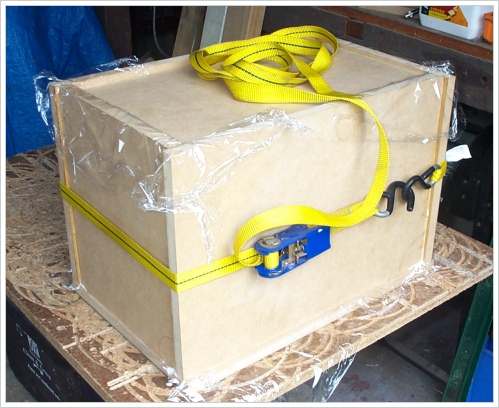
- The top panel should overhang the side panels by 5mm
- The side panels should overhang the bottom panel by 5mm
- The side, top, and bottom panels should overhang the back panel by 5mm
- The back panel is supported by the shelf brace (not glued)
- The back and front panels hold everything square
Paint the grille frame
Since this is a short work day, it's a good opportunity to spray paint the grille frame.
Choose a color that is close to that of the grille cloth you will be using.
Don't paint the back of the frame as some glues react badly to paint, and it's not visible anyway.
- Flush-trim joints
- Route driver hole
- Drill and rebate hole for LED
- Route and rebate rear connector hole (if used)
- If the port uses the shelf brace as support, glue shelf brace to front panel
- Glue in back panel
Flush-trim the edges of joints glued so far
Use a router and flush-trim bit to clean up the sides of the top panel and the bottoms of the side panels. The bit has a bearing that follows the surface of the adjacent panel, allowing the top to be trimmed flush with the sides
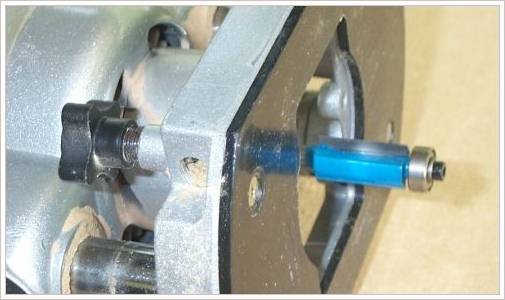
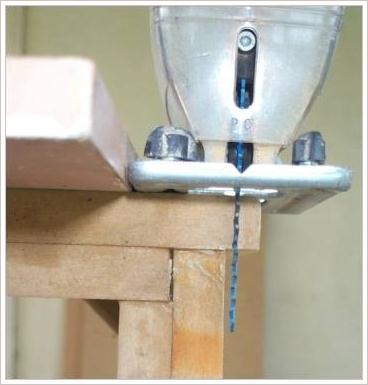
If you have cut your panels oversize by more than 5mm, you can minimise the work that the router bit has to do by using a jigsaw to trim off any excess. A clamped guide piece will prevent any accidents...
Cut hole for driver
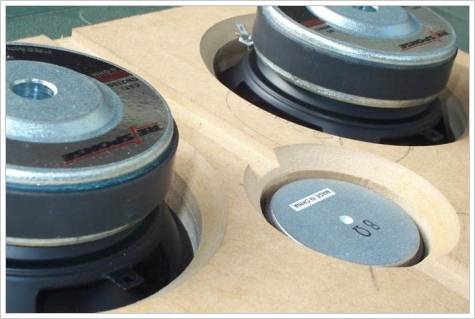
Front panel - cut rebated speaker hole and port holes using plunge router and circle jig
Quick Tip
When cutting out circles, put two screws through the panel inside the area to be cut out, and clamp the rest.This will stop any movement when you cut that last little piece out - otherwise you will damage your panel.
The screws need to be long enough to go into the work surface under the panel. I have a work table with a chipboard top that I can screw into and route into to my heart's content. When it gets too chewed up, I just replace it.
For the driver cutout, do the larger diameter first and then the smaller.
Depending on the plunge capacity of your router, you may have to turn the panel over to complete the cut.
If you are using this walk-thru for a smaller speaker rather than a subwoofer, you may want to cut a chamfer at the back of the panel to allow the drivers to breathe. These drivers will be mounted with wood screws, but if you are using hurricane nuts, or the like, you should leave some material where each nut goes.
Port opening
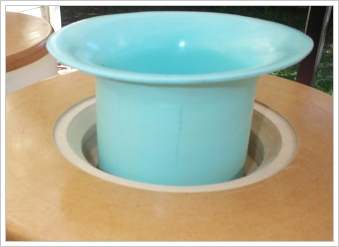
If you are using a port with the flare routed into the front panel...
From the back of the front panel, plunge route a cylindrical cut the exact diameter of the port
and to a depth of just over half the panel thickness.
This will allow the port to bridge both sections of the double layer front panel.
Route a smaller hole right through from the front. Make this 10mm smaller diameter than the port's internal diameter,
as it will be cleaned up later with a flush-trim bit and then a rollover bit.
If you are using a drop-in style port.
Cut the clearance hole and rebate to suit the port
Hole for LED
If required, drill LED indicator hole and route rebate.
Hole for rear connector for passive sub
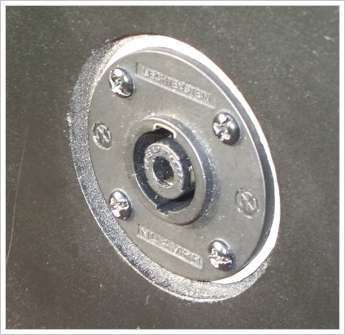
Whilst we have the circle cutter fitted, this session is a good time to do the rebate for any connectors on the back panel.
A neutrix connector provides a much more secure connection than binding posts. It looks better too - even sharper if you use countersunk screws...
Shelf brace as support for port?
If you are going to use the shelf brace as the support for the port, glue it to the front panel now. (don't do the PVC this session)
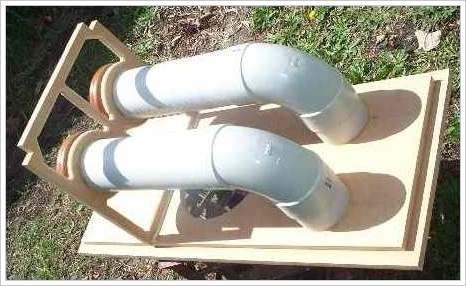
Re-assemble the box to hold everything square. Again, use some sandwich plastic to keep the glue contained
Here's an example...
Glue in back panel
If you have a large clamp, use it to hold the sides in tight against the back panel
- Glue in edge bracing
- If the shelf brace is not glued to the front panel, glue it into box
- Glue port to front panel
Edge and shelf bracing
Lay box on it's back and glue in the edge bracing for the back panel. This will sit in place without needing clamps
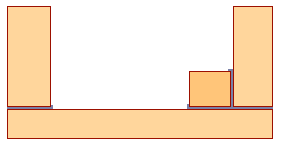
Edge bracing tripples the contact area for the glue, resulting in a much stronger joint
If the shelf brace is not already glued to the front panel, glue it into the box now.
Since there is often a slight amount of play in the slots, fit the front panel whilst the glue gets it's initial set.
Use some sandwich plastic to protect the front panel.
After an hour or so, carefully remove the front panel and fit the remaining edge bracing.
Note that the bracing doesn't go all the way to the front of the box - there has to be room for the inner front panel.
Cut the bracing a tiny bit short so it can't foul the front panel when it is fitted later.
Four clamps are required to hold this bracing in place
No edge bracing is needed for the front panel because the front inner panel does the job for you
Port
Glue port stub to front panel using silicone or quick setting epoxy. Don't use polyurethane as it doesn't stick well to PVC ...
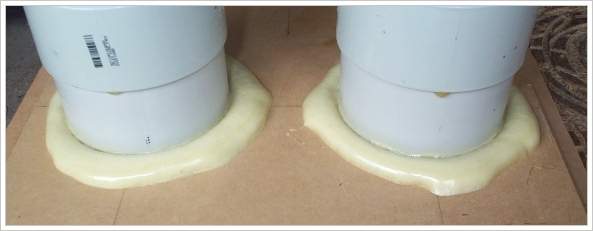
Polyurethane glue just runs down PVC
Glue remaining port pieces with plumbers glue, silicone or quick setting epoxy.
Use masking tape to prevent excess glue finding its way onto the inside surfaces of the port.
If ports pass through shelf brace, a generous application of hot melt glue can be used
to stabilise the ports to the brace
Quick Tip
Normal silicone emits acetic acid as it dries, so if you absolutely must use it, give your box a few days to air before fitting your electronics and drivers.You are better to use Neutral-cure silicone, which is marketed as being suitable for sealing metal roofs
- Add extra glue to internal joints
When edge bracing is added, it often doesn't sit dead flat with the panels due to the dried glue from earlier sessions.
This step backfills any gaps with PVA glue.
Since we are using gravity to flow the glue into the gaps,
it takes a few days to get all edges done. Obviously if you are using polyurethane glue, this session is not needed.
- Clean up ports
- Glue in any damping material
- Glue on front panel
Sand interior of ports to remove any excess glue and sharp edges.
Glue in foam damping sheet to top and bottom panel if required.
This helps if top-bottom dimension is large enough for standing wave to be a problem.
For subwoofers, this is only required if enclosure is tall. For example a 1m tall enclosure
will have a top-to-bottom standing wave of 178hz.
See Boxnotes for calculating your own
- it will also calculate the dimensions of each panel and can print your cutting list
- Flush-trim edges
- Route rollovers where desired, including port if used
- Align grille frame with box and drill holes for clips
- Clean out dust and silicone internal seams
Flush trim any overhanging edges. Rollover trim all external edges (unless you are going to use veneer)
Routed port flare
If you are using routed port flares, then use a rollover bit to create the flare.
Grille clips
Align the grille frame on front panel and drill small pilot holes all the way through frame and panel.
This prevents an airlock when gluing the clip body into the panel later on.
After drilling the first hole, put a small nail through the hole to maintain alignment.
Repeat for the second hole, drilled diagonally opposite.
Use speedbore style bits, also known as spade bits,
to countersink the holes for the clips in both the frame and the front panel
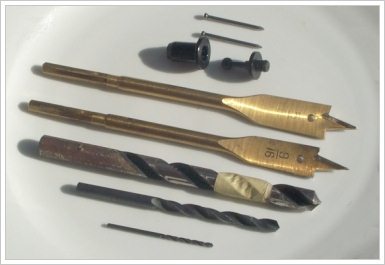
Bits for fitting grille clips
Sand all over ready for applying your selected finish. Vacuum dust from box, then wipe out with a damp cloth.
Apply silicone to all internal seams - much easier if you use some latex gloves!
In the days that you are applying your finish to the enclosure, fit the cloth to the grille, then trim and fit clips
Once you have completed your finish and added the drivers, it is a good idea to run a sweep test to check for any buzzing or resonances you have missed - for example, I found the driver on one project needed to be tightened.
On another project, I discovered an air leak around some speaker terminals - the resultant unloading of the cone and excess excursion meant a loss of 3dB in usable output!
I like to use some free software called SigJenny which can generate a continuous bi-directional sweep without any clicks.
Check that your system volume is not set too high, resulting in clipping in the sound card. This can be checked using TrueRTA's oscilloscope funtion, which is available in the free version
