
Donuts and Smoothing Rings
When you are unable to flange mount a port intake, don't just leave it hangin' - fit a Donut ring or a Smoothing ring
Most PVC pipe used for ports has a wall thickness of only 2 - 3 mm, meaning a very tight turn for the air, causing whistling and turbulence. The normal approach is to flare the port intake with a flare that is a similar size to one fitted the port exit.
Where this is not possible, a donut style ring is worth fitting.
If there isn't enough clearance for this, a smaller smoothing ring will always fit.
The inspiration comes from ram tubes used in race cars.
Race tuned engines use Ram Tubes to increase airflow. The tube is of a tuned length and has a flared "bell" to control turbulence. The cheaper models have a partial roll on the flare, but the best ones have a "full radius" bell. This picture of a Chevy V8 injection system comes courtesy of Top End Performance in the states. They have more pictures....
Anyway, back to the walk-thru...
The easiest way to make them would probably be with a lathe, but most DIY speaker builders don't have one. Most of us however do have a router. Here are walk-thru's for both styles of rings - You will need the following bits:
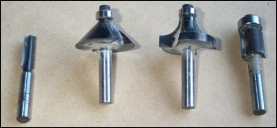
Router bits used - Small Groove, 45 degree Chamfer, Rollover, Flush-trim
Quick tip
If you are making more than one, it is easiest to do them all at once. Screwing your sheet to a sacrificial board underneath allows the use of screws to hold the centres of any circles cut out, preventing the circle jig from moving when the last little bit is cut.
Firstly, the Donut Ring
Here's a quick overview, and then on to the details ..
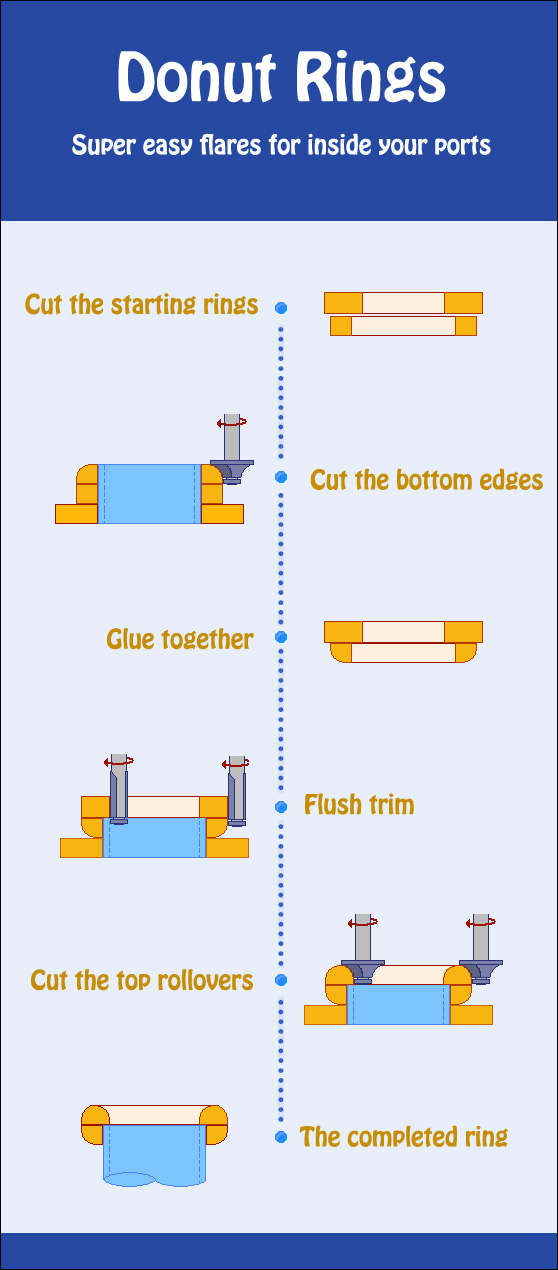
Step 1 - Cut the starting rings
Fit a small groove bit to the router and fit circle cutter
Make a ring that has an internal diameter equal to the OD of the port tubing.
The outside diameter of this ring is the ID of the port plus the radius of the rollover bit times four.
This ring is the bottom ring in the following drawing.
If you are only making treatment for one port, you will need to make another identical ring to use as a spacer
in the next step.
Make another ring that has an ID equal to the port ID minus 10mm, and an OD that is 10mm larger than the first ring.
Step 2 - Cut the bottom rollover
Make up a mounting board with a stub of pipe that is 3 thicknesses long.
Slide a pair of the small rings onto the stub as shown.
Remove the circle cutting jig from the router and fit the rollover bit. Cut around the ring as shown here.
Quick tip
Use some scrap to support the outside edge of the router to keep it level.
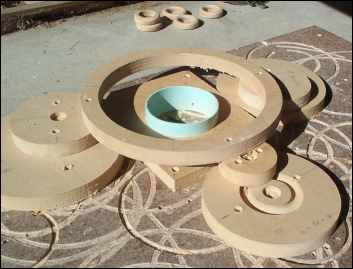
This photo shows the mounting stub surrounded by a large ring at the correct height to support the router.
Five completed "donuts" can be seen in the background
Step 3 - Glue together
Remove the rings from the stub and glue the freshly cut ring to the larger ring made in step one.
Step 4 - Flush trim
Replace the stub of pipe with one that is only two thicknesses long.
Push the glued rings on and use a flush-trim bit to open up the ID of the donut to match the ID of the port.
Also trim around the outside so that the two halves match
Step 5 - Cut the top rollovers
Fit the rollover bit and cut the inside and outside rollovers to complete the donut shape
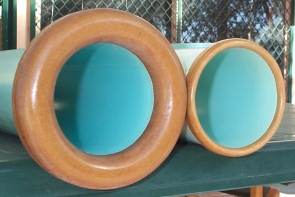
The completed donut ring
Next, the Smoothing Ring
Cross-section of small smoothing ring showing cutting steps
Step 1 - Outside face
Fit small groove bit
Fit circle cutter
- adjust radius to suit required OD of finished smoothing ring
Secure centre of ring with 2 screws
Cut all the way through
Step 2 - Recess to accept port
Adjust circle cutter to cut inside the pipes OD
Use a test peice to get a snug fit for the pipe
Set depth limiter to half way down
Cut groove to accept pipe
Reduce radius on circle cutter and widen groove in preparation for cut-through in step 5
Step 3 - Chamfer on rear face of ring
Fit 45 degree chamfer bit
Remove surrounding board to allow room for bit
Cut chamfer around outside of ring
Step 4 - Outside rollover
Turn ring over
Fit rollover bit
Cut rollover on outside edge
Step 5 - Inside face - initial cut through
Replace surrounding board
Refit small groove bit and circle cutter
Cut groove that is 5mm smaller in radius than pipe ID
Cut to about 90% depth all the way round
Cut right through for about 90% of the circle
Unscrew ring and cut the last bit with small hand saw
Step 6 - Inside face - clean-up
Mount ring onto a stub of pipe that is secured onto some scrap sheet
Remove circle cutter and fit flush-trim bit
Flush-trim centre of ring using stub of pipe as a guide
Step 7 - Inside rollover
Fit rollover bit
Cut rollover on inner edge of ring using stub of pipe as a guide
Remove ring from stub and hand sand any sharp edges.